Paper Bag Machine Maintenance: A Checklist Built Around What Breaks
Quick answer Good paper bag machine maintenance is organised around six assemblies, not around days: the sheet feeder, the gluing unit, creasing and die-cutting, folding and forming, the handle unit, and the drive and control system. Each one produces a specific bag defect when it is neglected, which means your finished bags are the fastest diagnostic tool you own. Check the feeder and glue every shift, work through the mechanical settings weekly and monthly, and stock the wear parts whose lead time is longer than you can afford to stop.
Most paper bag machine maintenance guides tell you to clean, lubricate and tighten. That advice is true and almost useless, because it never says which check protects which part of the bag. An operator who knows that a hardened suction cup eventually shows up as a jam in the folding section will do that check. One who has only been told to “keep the machine clean” will skip it on a busy shift.
This guide takes the opposite approach. It works backwards from the defects you find on the delivery table to the assembly that caused them, then sets the intervals accordingly.
What paper bag machine maintenance actually protects
Maintenance on a bag machine protects three things in a specific order: the value already sitting inside the machine, the machine itself, and your delivery date. That order matters when you decide what to skip under pressure.
On a printed and laminated job, every sheet in the feeder has already absorbed its board cost, its print cost and its lamination cost. A jam does not waste paper. It wastes finished value. This is why the checks on the front of the machine earn their time back faster than the ones at the back.
The second thing it protects is consistency. A machine drifting slowly out of adjustment does not stop, which is what makes it expensive. It keeps running and quietly moves your reject rate up, one or two percent at a time, until a customer complains about a batch you have already shipped.
The paper bag machine maintenance checklist, by assembly
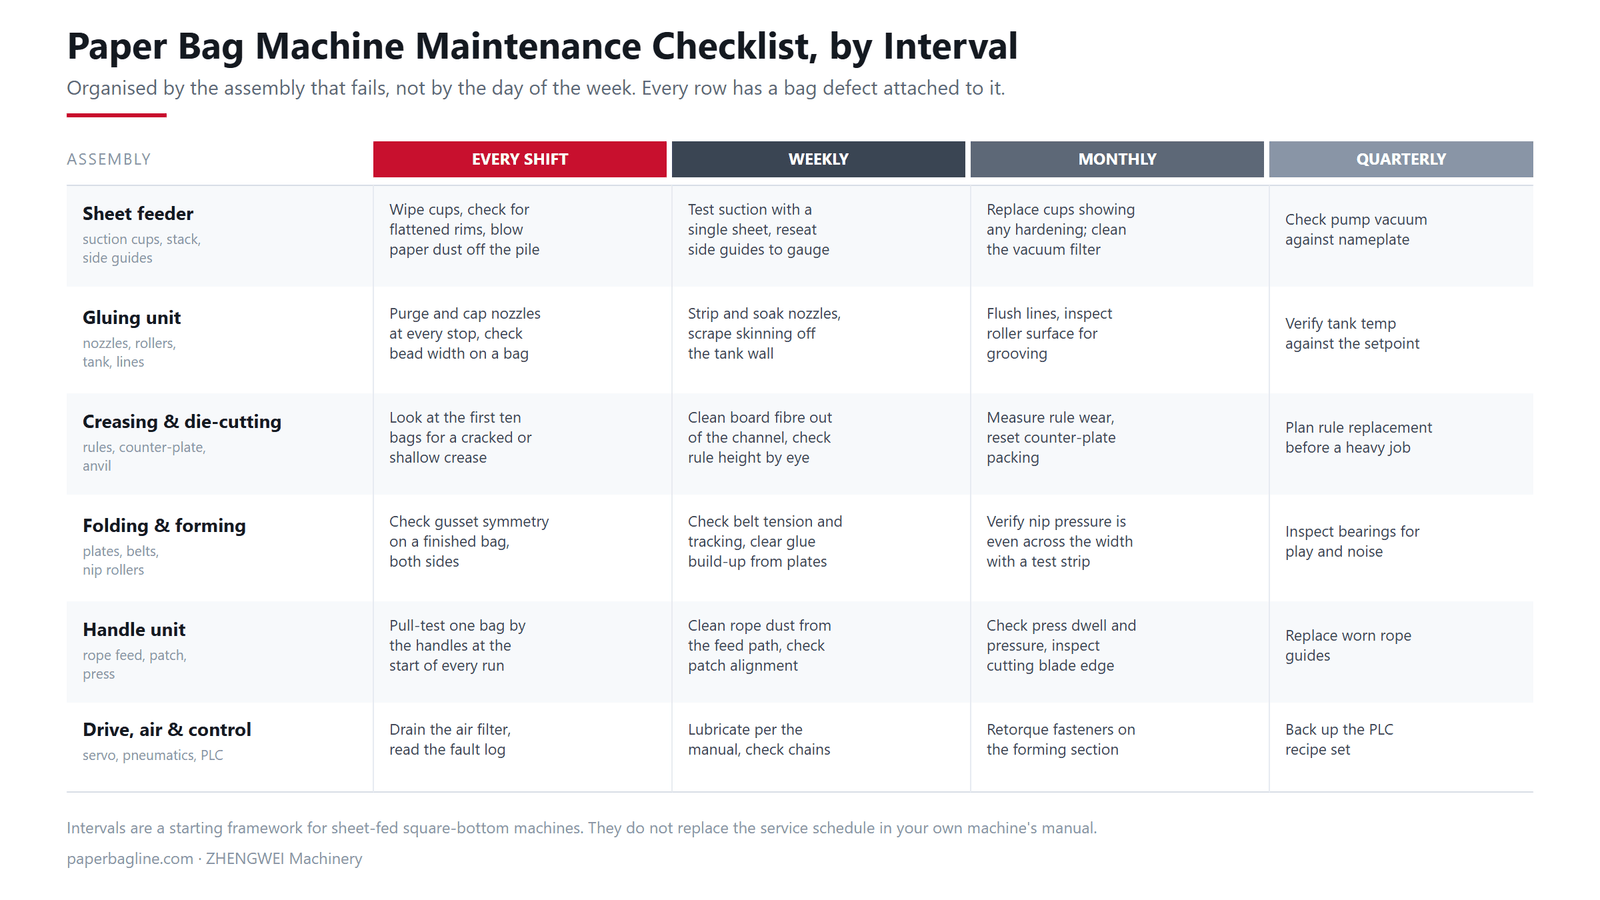
Group the work by assembly and the checklist becomes something an operator can actually run without a manual open. Six groups cover a sheet-fed square-bottom machine.
| Assembly | Every shift | Weekly and monthly | What it prevents |
|---|---|---|---|
| Sheet feeder | Wipe cups, look for flattened rims, blow dust off the pile | Test suction on a single sheet, reseat side guides, clean the vacuum filter | Double feeds and jams |
| Gluing unit | Purge and cap nozzles at every stop, check bead width | Soak nozzles, scrape tank skinning, flush lines | Bottoms that open under load |
| Creasing and die-cutting | Inspect the first ten bags for a shallow crease | Clear board fibre, measure rule wear, reset packing | Cracked folds on heavy board |
| Folding and forming | Check gusset symmetry on a finished bag, both sides | Belt tension and tracking, even nip pressure across the width | Off-centre gussets |
| Handle unit | Pull-test one bag by the handles at the start of every run | Clear rope dust, check patch alignment, press dwell and pressure | Handles that tear out |
| Drive, air and control | Drain the air filter, read the fault log | Lubricate to the manual, retorque forming fasteners, back up recipes | Drift you cannot trace |

Two of those rows carry most of the risk. The feeder and the gluing unit are where a small, cheap neglect turns into a stop, and they are also the two an operator can check in under a minute without tools.
Print the checklist and hang it at the machine, not in the office. Ask the operator to sign the shift column rather than the whole sheet. A signature per shift turns a wall poster into a record you can look at when a batch goes wrong three weeks later.
Read the bag: six defects and what each one points to
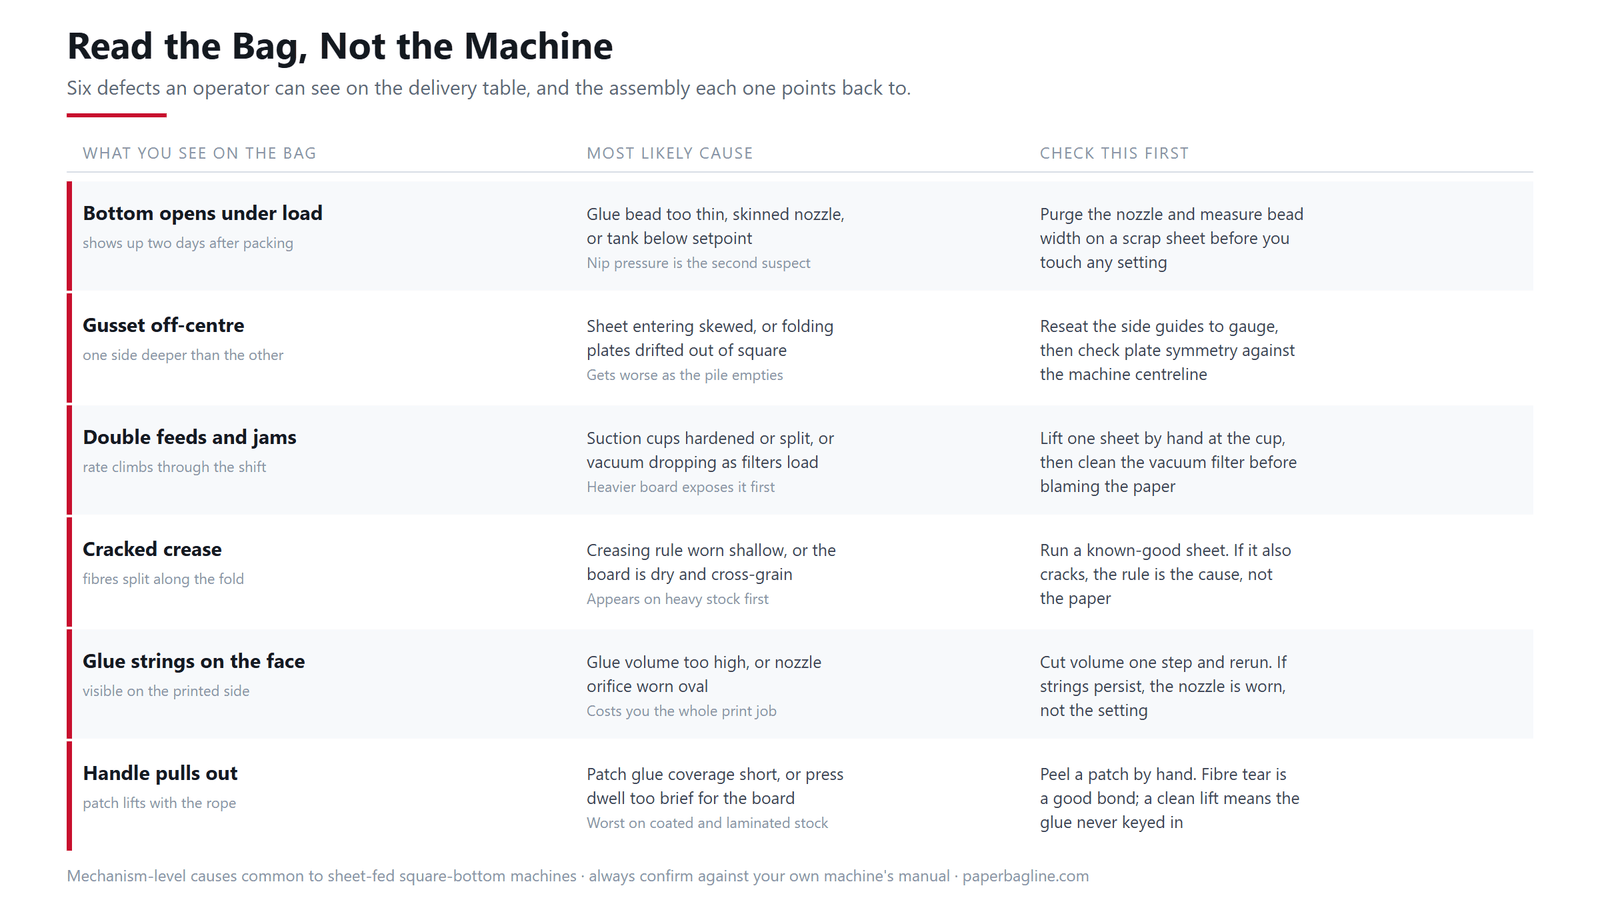
The fastest diagnostic on a bag line is a finished bag, because every assembly leaves its own signature when it drifts. Learning six of them removes most of the guesswork from a stoppage.
| What you see | Most likely cause | Check first |
|---|---|---|
| Bottom opens under load | Thin glue bead, skinned nozzle, or tank below setpoint | Purge the nozzle and measure bead width on a scrap sheet |
| Gusset off-centre | Sheet entering skewed, or folding plates out of square | Reseat side guides to gauge, then check plate symmetry |
| Double feeds and jams | Cups hardened or split, or vacuum falling as filters load | Lift one sheet by hand at the cup, then clean the filter |
| Cracked crease | Creasing rule worn shallow, or dry cross-grain board | Run a known-good sheet. If it cracks too, the rule is the cause |
| Glue strings on the face | Glue volume too high, or nozzle orifice worn oval | Cut volume one step and rerun before replacing anything |
| Handle pulls out | Short patch coverage, or press dwell too brief for the board | Peel a patch by hand and look for fibre tear |

Notice how many of these point at the paper before they point at the machine. Board that has been stored badly, or specified at the wrong weight for the job, produces symptoms that look mechanical. It is worth confirming which grammage band your machine can actually feed before you start adjusting settings that were correct yesterday.
Keep one boxed ream of a board you know runs well, sealed, as a reference stock. When a defect appears, run twenty sheets of it before touching a single setting. If the defect disappears, the problem is the delivery, not the machine, and you have just saved yourself a day of adjustment.
Why the cheapest skipped check costs the most
The items people skip are the ones that look trivial, and that is precisely why they are expensive. A consumable worth very little can stop a line that is full of finished board.
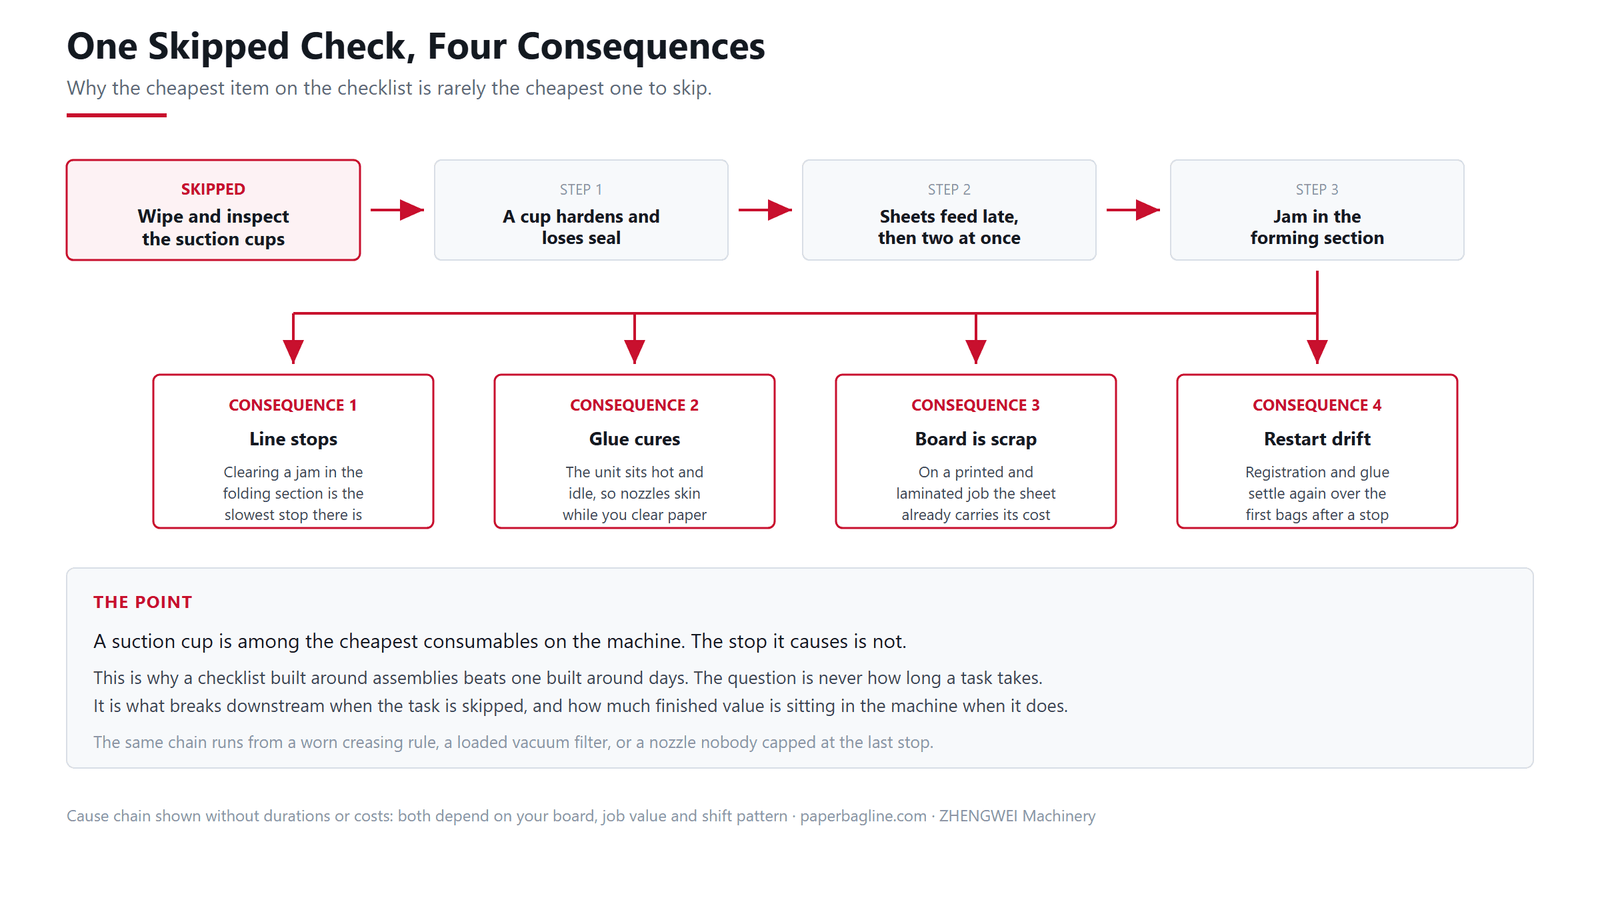
Follow the chain. A cup hardens, so sheets start feeding late, then two arrive together and jam the forming section. While the operator clears paper, the glue unit sits hot and idle and its nozzles begin to skin. The board in the machine is scrap, and the first bags after the restart drift on registration until everything settles.
None of those four consequences appear on a maintenance schedule. All four are on the invoice.
Which spare parts to stock
Half of paper bag machine maintenance is having the part on the shelf when you need it. Stock by lead time, not by price. The correct question is not what a part costs but how long your line sits still waiting for it, and those two numbers are unrelated.
- Always on the shelf: suction cups, glue nozzles, air filters, belts. Cheap, wear steadily, and each one can stop the line on its own.
- Worth holding one of: creasing rules and rope guides. They wear predictably, so you can plan replacement before a heavy job rather than during one.
- Confirm the lead time instead of stocking: servo drives, PLC modules, bearings. Too expensive to sit idle, but you need a written answer on how fast they arrive.
That last category is the one to settle before you sign a purchase order, not after a failure. Preventive maintenance only works when the parts it depends on are actually obtainable.
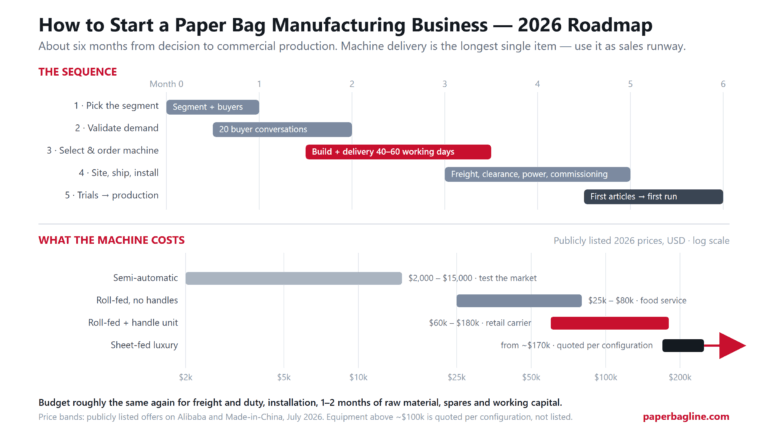
Ask any supplier for the lead time on a wear part you will replace yearly, in writing, before you compare quotes. A five-day answer and a forty-five-day answer change your five-year running cost far more than the difference in machine price. This is one of the checks in our guide to choosing a paper bag making machine.
How machine design changes the paper bag machine maintenance load
Two machines that make the same bag can carry very different maintenance loads, because the work is distributed differently. Feed type is the biggest single factor.
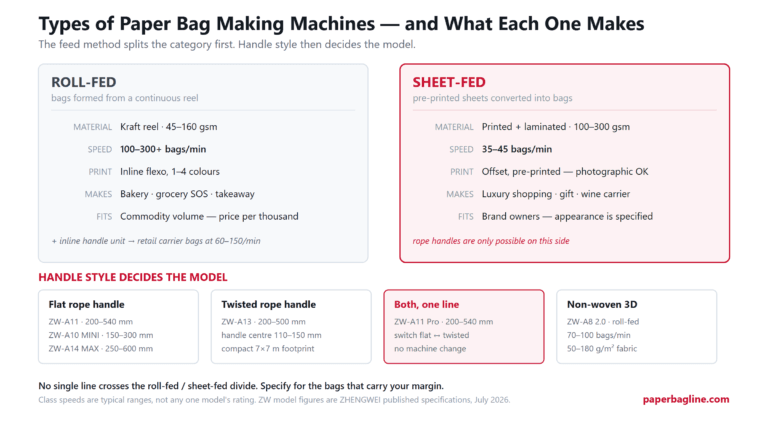
A roll-fed line has no sheet feeder to maintain, which removes the suction-cup work entirely. In exchange it adds web tension control, splice handling and, where inline flexo is fitted, a printing section with its own daily routine. Sheet-fed machines reverse that trade: more feeder attention, no web or print units to service.
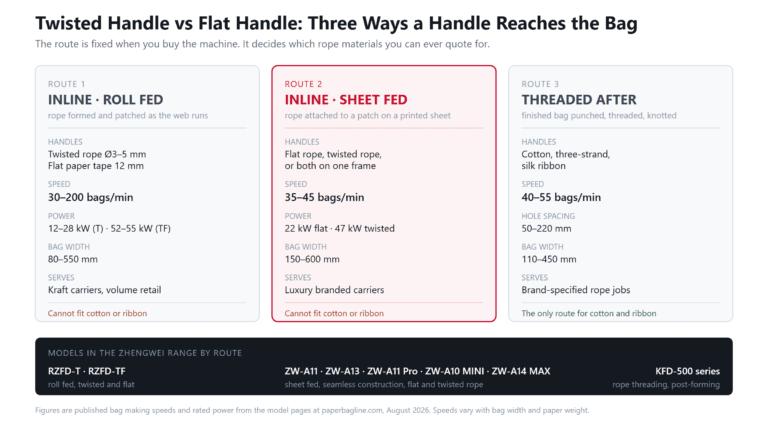
Handle attachment moves the load again. Machines that fit handles inline carry a handle unit that needs a pull-test every run, while operations that thread rope after forming move that maintenance onto a separate machine. The three routes a handle takes onto a bag each come with their own wear points.
Maintenance on the ZW seamless series
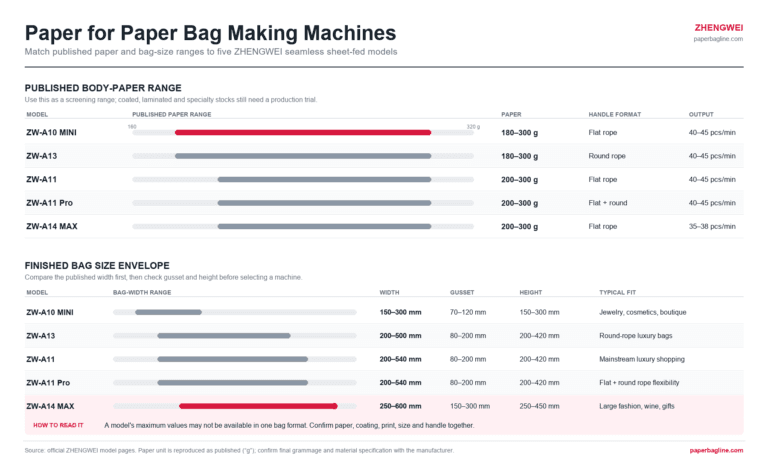
All five ZHENGWEI ZW models are sheet-fed, so the checklist above maps to them directly, with the feeder and handle unit carrying the daily attention. Two design points change the routine slightly.
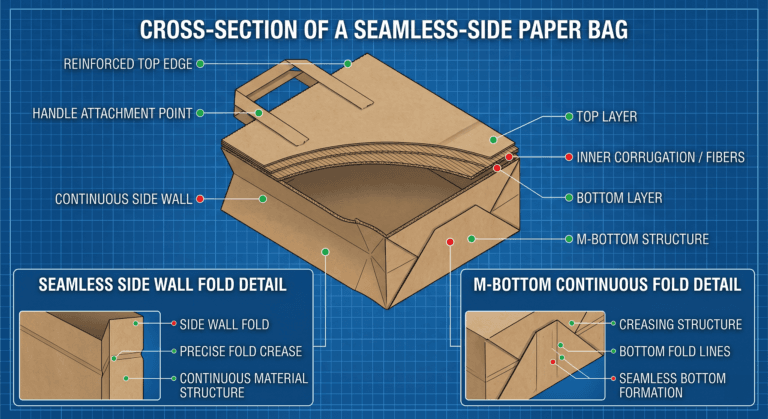
Because these machines fold the bag around a one-piece bottom, there is no bottom-seam gluing station to maintain, and the checks concentrate on the side-fold glue instead. Footprint and connected load also differ more than buyers expect across the range: the ZW-A13 fits a 7 × 7 m bay yet draws 47 kW, while the large-format ZW-A14 MAX runs 600 mm bags on 22 kW. Plan your compressed air and electrical service against the model you actually ordered.

One limitation worth stating plainly. Nothing in this guide replaces the service schedule in your own machine’s manual, and no supplier can diagnose a defect remotely from a description alone.
The intervals here are a starting framework for sheet-fed square-bottom machines. If your manual specifies something different for your model, follow the manual. Where we can help is the part a manual never covers, which is reading a bag and working backwards to the assembly.

Frequently asked questions
What should a paper bag machine maintenance checklist cover?
It should cover six assemblies: sheet feeder, gluing unit, creasing and die-cutting, folding and forming, handle unit, and the drive and control system. For each one, list a per-shift visual check and a deeper weekly or monthly task. Attaching the bag defect that each check prevents is what makes operators actually run it.
How often should a paper bag making machine be serviced?
Paper bag machine maintenance splits across three cycles. Feeder and glue checks belong in every shift because both fail quickly and both stop the line. Mechanical settings such as belt tension, nip pressure and rule wear suit a weekly to monthly cycle. Drive, bearing and control tasks fit a quarterly review. Confirm all of these against your machine’s own manual.
Which parts wear out first on a paper bag machine?
Suction cups, glue nozzles, belts and air filters wear fastest because they work every cycle and sit in a dusty environment. Creasing rules and rope guides wear more slowly but predictably. Stock the first group permanently and plan replacement of the second before a heavy job rather than during one.
What does paper bag machine maintenance cost per year?
The consumables are a small line item compared with the downtime they prevent, so the useful figure is not the parts bill. What drives real cost is spare-part lead time, how much finished board sits in the machine when it stops, and whether your operators catch drift early. Ask suppliers for written lead times to make this comparable across quotes.
Can operators do the maintenance, or do I need a technician?
Everything on the per-shift and weekly list is operator work, and it should stay that way because operators are the people who see the bags. Rule replacement, nip pressure setting and anything involving the servo or PLC needs a trained technician. The split matters less than making sure the daily items never wait for one.
Do I still need the manufacturer’s maintenance manual?
Yes. Lubrication points, torque values and service intervals are model-specific and no general guide can substitute for them. Use a checklist like this one to structure the routine and to train operators on what each check protects, then take the numbers from your own manual.
Talk to us about your line
Tell us your machine type, board and the defect you are chasing, and we’ll tell you which assembly to look at first.
Get in Touch